Friday, November 11, 2011

Observing the Earth

One of the easiest planets to observe is our own, the Earth.

It is possible to view the Earth as an "astronomical object", in a way, even though you're standing on it. One way is to view your local daily cycle of night and day as it appears on other planets and the Moon--becoming aware of the terminator as it passes by twice each day.

Another is to enjoy the events of the Earth's own sky. Clouds, colors of sunlight, meteors, and auroras are all Earth phenomena that we can enjoy as astronomers. The play of light on clouds, especially at sunset and sunrise, is not only beautiful but can tell us what the sky is going to be like in the next several hours.

Meteors can be seen on most any clear night, preferably with little moonlight. The best scientific instrument for watching meteors is a reclining lawn chair, such as a chaise lounge. Meteor showers occur regularly, but even when there are none there are a fair few meteors, and I've spent nights under the sky where I was sure there must be a shower, there were so many meteors, when there was none.

Auroras are rare at my latitude, but that makes them an even more special phenomenon. Whether I go to where they are, or whether the Sun's activity brings them to me. They're amazing and magical.

Even when I can't see the universe beyond our own atmosphere, there are clouds and often lightning to see. No night need be a "wasted" night. And if you really must observe the universe, consider making a simple radio telescope!
StumbleUpon

Sunday, October 30, 2011

The Phases of Venus

Venus is the second planet from the Sun, and makes for a satisfying viewing target. Though it is covered with clouds at all times, it is not devoid of detail.

The planet Venus shows phases, like the Moon. In fact, the most common comment I hear when showing Venus through my telescope is "It looks like the Moon!"

During the daytime, it can be seen as a ghostly moon-like object. It takes great care to keep the telescope from viewing the Sun. If this can be managed, Venus shows up well during the day. The trick is to position the telescope away from the Sun, on the same side of the Sun as Venus, by using the shadows on the telescope without looking through the scope (and probably covering the end of the scope to keep the sunlight out!) Then, once you're sure there's no Sun in the scope, look through and sweep away from the Sun. Practice sweeping in the correct direction before your eyeball is at the scope.

At night, you don't have to worry about this. If anything, you may find Venus is a bit too bright. A color filter or neutral density filter can help cut the light down a bit to make it more comfortable to view. Careful and patient use of a variable polarity filter can reveal murky details in the clouds of Venus.

Venus shows a full set of phases, from new and thin crescent phases to a Full Venus.

It can be a lot of fun to watch Venus from week to week as its phases change. It goes much more slowly than the Moon, overall, but there are some phases that seem to shoot past, and others (like full) that seem to last forever.

Ordinary binoculars won't show the phases clearly, but when Venus is away from "full" it'll sure look like something's wrong. Crescent phases can take on all sorts of interesting shapes in binoculars, sometimes looking like a line, other times looking just mis-shapen.

For the early Greeks, Venus has two names depending on whether it was a morning star or an evening star. As a morning star it was Phosporus, it was called Hesperus as an evening star. In the sixth century B.C. Pythagoras recognized it as a single object, which was named Aphrodite and later given the Roman name Venus as the goddess analogous to Aphrodite.
StumbleUpon

Sunday, October 23, 2011

Viewing Planet Mercury

Planet Mercury is the closest planet to the Sun. Its orbit around the Sun is entirely within the orbit of the Earth. This means that from our point of view, Mercury always appears in the sky near the Sun. Sometimes it is seen setting in the evening shortly after the Sun sets, other times it is seen in the morning just before the Sun rises. At other times it is invisible, lost in the Sun's glare.

The early Greeks had two names for Mercury, depending on whether it was seen as a morning star or an evening star. As a morning star it was Apollo, as an evening star it was Hermes. It was later recognized to be a single object, and the name Hermes, the messenger of the gods, was the precursor to the Roman name Mercury that we use today.

Mercury can be seen by eye as a medium-bright red-orange star near the Sun. Binoculars will show that it's not a star, but a very small disk-like shape that looks un-star-like. It looks much the same in a telescope, though under good conditions it will show a "phase" like one of the Moon's phases, most commonly a crescent, since it is usually seen when well away from the Sun. It doesn't show any detail in telescopes, it just appears as a small reddish-orange shape, its shade of color varies some because of Earth's atmosphere.

At times it moves very quickly across the sky. Its position relative to the Sun, and to the stars in the sky, can be seen to change rapidly from day to day. It makes an interesting project to keep track of Mercury's position in the sky on a star chart over the course of a month or two.
StumbleUpon

Friday, August 5, 2011

Learning the Constellations

Learning your way around the sky at night is a matter of learning to see some of the patterns in the stars so that you can pick out particular stars, and have an idea of where other stars are with respect to them. It's a piecemeal process that takes a bit of time, but is very rewarding.

One Step At a Time

Don't expect to learn a lot of constellations all at once, or, if you do, don't expect it all to stick. Part of the challenge is that the constellations change their place in the sky all the time, and that the ones that are visible will vary by the season.

Because of this, if you learn some constellations tonight, then come back out under the sky in a few weeks, the constellations will have moved. As the Earth goes around the Sun in its orbit, the constellations up at a particular time of night will change a bit and those that stay up will appear to have moved in the sky. They will also change their orientation, so the stars that were on the bottom are now on the side.

Don't be discouraged. Learn the stars by relative positions. Turn yourself and your body around to see the patterns you've memorized. Where possible, get out often to see them before they've changed beyond recognition.

Season's Greetings
Since different stars are up in the early evening at different times of the year, it's also useful to divide the constellations you know by the season you see them. For myself, The Archer, The Scorpion, The Snake-Handler, and The Virgin are summer constellations. Orion, the Big Dog, Small Dog, and Gemini are winter constellations. Perseus the Hero, Andromeda, and Pegasus are spring constellations.

When I see one of these, I think of the others and locate them in the sky by the one I see first. In fact, these constellations are not just visible in the season I think of them belonging to, but that's when I learned them, and that's when I know I can see them on a clear night with a good view of the sky around me. It breaks up the job of learning what's where.

High and Low
It's often easiest to locate new constellations when they are either near the horizon in some direction, or at the highest point in the sky. The ones that are in-between often seem to be harder to get a handle on, unless they have some special feature that makes them easier to see as a constellation, like the Big Bear's seven stars of the Big Dipper that are all about the same brightness in the same part of the sky.

With a star chart for the time of year you're out, and the time of night, you can see what should be near the horizon in any given direction as well as what should be directly overhead. Pick out particularly bright stars on the chart to use as guides. Then find other bright stars on the chart, and locate them with respect to the first one you found. Then look at the less bright stars, and get them placed with the constellation they belong to. After a while, you should be able to see the "picture" of the constellation in the sky.
StumbleUpon

Tuesday, July 12, 2011

Wine Tasting Under the Stars

If you haven't had a chance to enjoy a star party, either as an astronomer or an attendee, I highly recommend going to one. Chances are there are astronomers in your area who hold regular star parties. In my fairly remote area, there are at least three groups running star parties on a regular basis.


One of the star parties I helped organize this year was at a local vineyard. They combined our star party with a wine-tasting and music event at their site. We did this star party at David Girard Vineyards, in Coloma, California.

We had six different telescopes out at this event (the sixth arrived after these pictures were taken.) Attendees got to see a wide variety of astronomical objects through the scopes while enjoying wines, cheeses, and so on. It was a very nice event for everyone.


Attendees got to see the heavens not only through the astronomer's telescopes, but with their eyes alone on green-laser guided tours of the constellations. Green laser pointers are used because the beam itself is visible at night, so it can be used to point things out under the real sky just as effectively as a planetarium lecturer can point things out in their dome.

The astronomers who chose to partake of the wines got to enjoy those while showing the skies, and we all enjoy sharing our hobby and knowledge with an appreciative audience. When I spoke to the other astronomers afterward (there's usually little chance for us to talk among ourselves while during the event itself), we all felt like the time had gone by amazingly quickly. This is a good sign that everything was going well, and that we all had lots of interested attendees to show the sights in the skies.

For at least one of our astronomers, this was their first time showing the sky to the public. It's a great experience, no matter what your skill level is in astronomy. There are always a few basic, easy to find objects you can show off at a star party. So long as you're familiar with your equipment and it's in good enough shape that you don't have to fiddle with it constantly, you're ready to do star parties.


I've been sharing the skies myself for over 40 years now. It started without any doing on my part. I got my first telescope when I was very young. I'd set it up on our front lawn to look at the Moon and stars while I was learning my way around the sky and my new telescope. This was during the heat of the space race, in the 1960s. People driving by on the street would see me with the telescope, stop their cars, and come have me show them things through my telescope.

For many people it was the first time they'd actually seen craters on the Moon with their own eyes. Even objects as simple as bright stars would interest them, even if I didn't know the name or constellation yet.

Their questions got me to learn more about what I was looking at. They'd ask me where the Surveyors and Rangers were on the Moon (Apollo hadn't landed yet.) That made me learn my way around the Moon with a map from National Geographic magazine that showed the locations of the probes, as well as the selected Apollo landing sites. I memorized them and that allowed me to answer the questions about the Moon. Similarly, I learned the names and constellations of the brightest stars, which was much harder since I really didn't know my way around the sky, yet.


The breakthrough came when I learned from a copy of Sky and Telescope in the library that the correct way to use a star chart is to hold it over your head. Just as you hold a map of the ground down low, and align it with the Earth, you hold a sky map over your head, and align it with the sky by putting it's north to your north.

If you are an amateur astronomer, find or organize a local star party. You'll find it improves your appreciation of your hobby in too many ways to list. If you're just interested in astronomy, find one to attend and enjoy. It's like having not just one telescope of your own but a whole bunch of self-pointing, self-maintaining telescopes to enjoy the heavens through.
StumbleUpon

Tuesday, June 14, 2011

Double Stars

About half of all the stars in our galaxy are part of a multiple star system. Either a binary star, triple star, or a larger group of stars. The stars are bound to each other by their mutual gravity so that they orbit each other. This puts them close enough to each other that we see them together in the sky.

In some cases the stars are of different types or sizes, so they make a striking pair when you look at them through telescope or binoculars. With half the stars in our galaxy being in multi-star systems, these pairs can be found all over the sky. I've found that the colors in stars are different through different sized scopes, certain colors are more intense with different diameters of scope. So it's interesting to look at the same pair of stars through different scopes on the same night to see how they look through each.

Albireo

Visually, Albireo is the star at the head of Cygnus the Swan. It's easy to see most of the year in northern latitudes. Through binoculars or telescopes the colors of the stars make for a striking contrast. One star appears as blue or white, depending on the night and your instrument. The other ranges from a deep amber or orange to a fair yellow. Whenever we're at a star party, if my wife hears that Albireo is in somebody's scope, she rushes over for a look at this celestial gem.

Albireo, a beautiful double star. Image by Hewholooks.
Albireo, image by Hewholooks


Use low magnification (<100x) on Albireo if you're using a telescope. You might want to take a second look at a medium level of magnification (about 100x) to see if there's a color change at this level.

Cor Caroli

Cor Caroli, "Charles' Heart", is what folks usually expect to see when you say "double star". The stars are of very different brightness, and it takes just a bit of effort to see the dimmer star in the glow of the brighter star. Low magnification will reveal the dimmer star, I usually show this star at 40x. Medium levels of magnification will make it easier to pick out the companion, but will tend to make the difference in brightness not as strong.

Cor Caroli, in Canes Venatici.
Cor Caroli


Visually, Cor Caroli is the brightest star in Canes Venatici, under the curve of the Big Dipper's handle. It's visible year-round in northern latitudes.

Algeiba

Algieba, or Gamma Leonis, is another pair with fine color. It's part of the backwards question-mark that forms the head and chest of Leo the Lion. It's the lower star in the back of the curl of the question mark.

Algieba, in Leo, a beautifully multi-colored double star.
Algieba, image by Roberto Mura


Binoculars will reveal the double, but I prefer to view it at low powers in a telescope.

Omega Scorpii

This is another blue-yellow pair in Scorpius, just a bit toward the head of the Scorpion from the northern claw. It's visible from both northern and southern hemispheres.

Omega 1 and Omega 2 Scorpii.
Omega 1 and Omega 2 Scorpii, image by Roberto Mura


This pair is widely separated, almost as much as the width of the Moon. View at low magnifications, or with binoculars. The entire area of sky around them is magnificent through binoculars.
StumbleUpon

Sunday, March 20, 2011

Rainy Nights

When the weather doesn't allow observation, what do you do?

1. Tune Up the Telescope.

Give it a once-over. Check the optics, check the lubrication on the focuser, make sure there are spare batteries for the red dot or Telrad finder, plus any other battery powered equipment in the accessories box. Organize and clean up the observing stuff in general.

2. Go Over the Observation Logs.

I've kept logs of my observation since I was 14 years old. I don't still have all of them, and I don't write a log every time I go out under the sky. But I appreciate it later when I do have logs from earlier years. On cloud cover nights, I can review them and reorganize them as necessary.

By going back over them, I can see objects that were particularly nice to observe that I may have forgotten about, or want another look at (once the sky clears.) I can see objects that I missed in the past that I never got back to. I can see some prior "records" I've set for most deep sky objects in a night, or most planets, satellites, or whatever.

All this gives me further inspiration for future observations. Some of my best observing sessions were planned on an overcast night spent with my logs.

3. Prepare for Future Observations

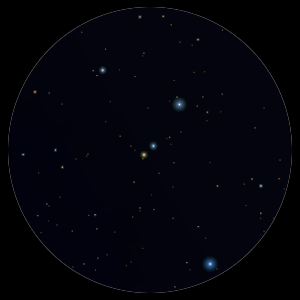
I've spent time learning new constellations, planning star-hops to new objects, and reading lists of objects (like double stars with interesting colors) in preparation for nights when I can get out and see stars.

I use software to learn constellations (Deep Space on my Amiga computer was really good for this back when), modern software packages can do this, too. Turn off the constellation lines and names, move the sky around a bit, make your best guesses in the part of the sky you can see, then turn on the lines and names and see how close you got.

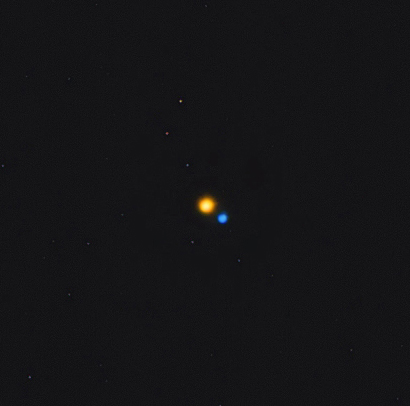
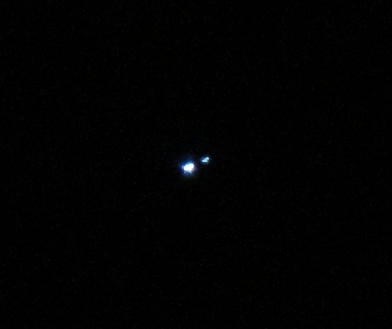
I also visit the online sky surveys to see what something is going to look like. First I visit objects I know to see how they compare to how they look in my telescope. Then I go to new objects to get an idea of what to expect. Sometimes things don't always look the way you expect, and sometimes you have more than one deep sky object (galaxy, nebula, star cluster) in one area, and you need to tell them apart.

4. Build a New Accessory

Once the scope and all are in good shape, chances are there's something else you'd like to have. This is a good time to make it, or go shopping for it if that's your preference.

5. Take Up Radio Astronomy

After a particularly long period of overcast, I once got so frustrated that I decided to take a first stab at radio astronomy. If I couldn't see light, I'd catch something that could get through the clouds. After considering and rejecting the idea of making a lens out of paraffin wax (which refracts some radio frequencies) I decided instead to do something a lot easier.

I made a simple corner reflector antenna. I put together a simple wooden frame (two triangles with sticks connecting them at the corners into a prism shape.) Then I put metallic screen across the back on two sides, and suspended a short dipole antenna across the front (two pieces of wire tied together in the middle by an insulator. I think it was kite string.)

Then I ran this to my short wave radio and hooked it up to the antenna screws on the back. I pointed it at where I supposed Jupiter to be, and after about three hours of messing around I heard radio signal from Jupiter, something like the shots of static from thunderstorms, but different. I kept the reflector around for a while, and showed it off to some friends once the sky cleared (it was a lot easier to point when I could see Jupiter).

Since then I have set up radio receivers to hear meteors and receive amateur radio "moonbounce" communications. All pretty easy stuff.

On occasion, I have considered drumming up a pair of old "big dish" satellite TV antennas and tying them together into a very small array. But the sky usually clears before I get very far. :)
StumbleUpon